


Pemmican & Curing Salts
Knowing how to properly cure your meats for making pemmican.

Pemmican has traditionally been made using whatever meat was available at the time: large game meat such as bison, deer, elk, or moose, but also fish, such as salmon, and smaller game such as duck, while contemporary pemmican may also include beef. The meat is dried and chopped, before mixing with rendered animal fat aka tallow. Dried fruit may be added, such as berries, cranberries, saskatoon berries, blueberries, cherries, chokeberries and raisins or currants. European fur traders have also noted the addition of sugar.

Among the Lakota and Dakota nations, there is also a corn wasná (or pemmican) that does not contain dried meat. This is made from toasted cornmeal, animal fat, fruit, and sugar.
Pemmican was likely first invented by the Inuit tribes living in Arctic areas and in Alaskan tundra, but it was also eaten by many tribes throughout the continents.
These tribes were nomadic and would often go out on long hunts. They would need a lot of energy to sustain these hunts but wouldn’t be able to carry a lot of food with them, nor spend the time searching for food along the way.
Their solution was to make pemmican to carry with them. Traditionally, pemmican is made by cutting pieces of game (elk, bison, moose, and deer were common) into thin strips and drying it into a jerky on a spit over a fire.
The jerky was pounded with stones until it became a powder. Then liquid fat was added to the powdered jerky in a 1:1 ratio. Sometimes dried berries were also added.
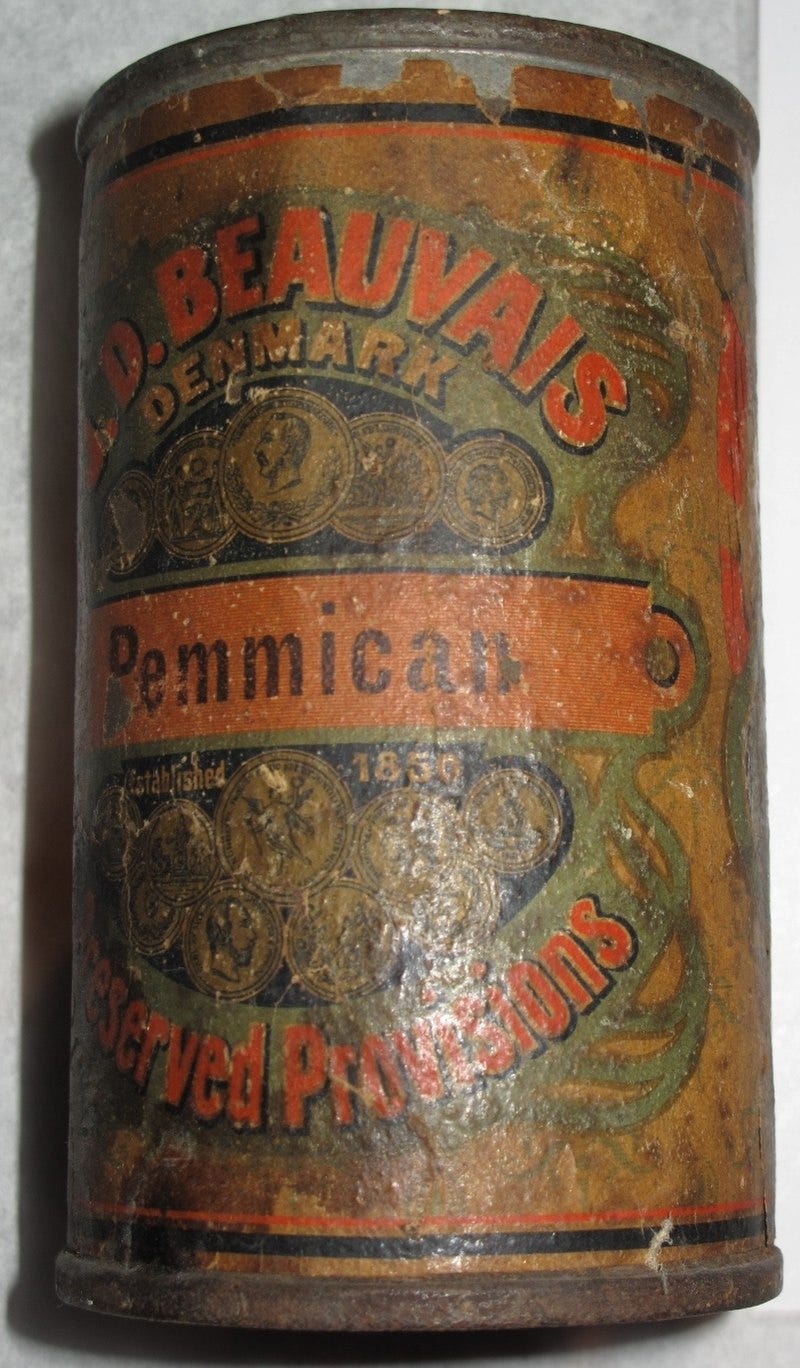
The basic unit of trade was an animal hide filled with pemmican, sealed with pure rendered fat of the seams, and weighing about 90 lbs. If it was kept away from moisture, heat, and direct sunlight, it would last for many years with no refrigeration or other measures of preservation. When explorers came to the Americas, they realized the value of pemmican. It was particularly popular with Canadian fur traders.
Many voyagers relied on pemmican during their expeditions. Notably, Robert Peary used pemmican on all his North Pole expeditions and said the journey would not have been possible with the pemmican.
The journals of the Lewis and Clark expedition clearly state that the Indian tribes they encountered consumed some berries, fruits and tubers as part of their diets. It seems reasonable that the inclusion of some dried berried would not be out of character for the batches of pemmican made in late summer when ripe berries were available. Berries do not appear to be a nutritional requirement, and they increase the chance of spoilage.
Please bear in mind that pemmican is NOT a raw food, as the fat needs to be heated above 200°F in order to release it from its cellular structure and drive out the moisture. It is not recommended as part of a daily RAF (Raw Animal Food) diet.
It is important that the lean meat used in pemmican be dehydrated at a temperature below 120°F, and a temperature between 100°F and 115°F is ideal. Temperatures above 120°F will “cook” the meat and will severely compromise the nutritional value for making pemmican.
Traditionally, the meat was cut in thin slices and dried, either over a slow fire or in the hot sun until it was hard and brittle. Approximately 5 pounds (2,300 g) of meat is required to make 1 pound (450 g) of dried meat suitable for pemmican. This thin brittle meat is known in Cree as pânsâwân and colloquially in North American English as dry meat. The pânsâwân was then spread across a tanned animal hide pinned to the ground, where it was beaten with flails or ground between two large stones until it turned into very small pieces, almost powder-like in its consistency. The pounded meat was then mixed with melted fat in an approximate 1:1 ratio by weight. Typically, the melted fat would be suet that has been rendered into tallow. In some cases, dried fruits, such as blueberries, chokeberries, cranberries, or saskatoon berries, were pounded into powder and then added to the meat-fat mixture. The resulting mixture was then packed into rawhide bags for storage where it would cool, and then harden into pemmican.
Pemmican is often called the “ultimate survival food” and rightly deserves its title as a “superfood.” It is basically a mixture of dried meat, fat, and sometimes dried berries.
It is very easy to make yourself without any special ingredients or tools necessary, just follow the simple instructions below. You can adjust the recipe however you like, by adding spices, herbs, and honey.
What Type of Salt to Use?
There is a lot of confusion and conflicting advice about what salt to use to cure meat. In the past, regular salt was used to cure meat. At some point, (probably around the 1800s, according to this history lesson), people started adding saltpeter to their curing mixtures.
Saltpeter is a name for either potassium nitrate or sodium nitrate. Contrary to common belief, saltpeter does not directly preserve food. Instead, certain bacteria in food are resistant to salt. They eat nitrates and then convert them into nitrite (NO3). A reaction then causes the nitrites to turn into nitric oxide (NO).
The nitric oxide then bonds with specific proteins in meat, causing them to turn pink and prevent oxidation. In this way, NO can kill deadly botulism spores and preserve meat. Note that saltpeter is meant to be used IN ADDITION TO SALT, not instead of salt.
Pink Salt and Prague Powder
Saltpeter used for curing today is typically called pink salt. The salt is pink because manufacturers add dye, so you won’t confuse it with regular salt. The pink dye doesn’t add color to the cured meat (the curing process with nitrates does that).
There are two types of pink salt:
Prague Powder #1: Pink salt #1 contains 6.25% sodium nitrite and 93.75% regular table salt. Use Prague Powder #1 for short-term cures that will be cooked after curing.
Prague Powder #2: Also called pink salt #2, it contains 6.25% sodium nitrite and 4% sodium nitrate, the remainder being regular table salt. Use Prague Powder #2 for dry-curing meats that will not be cooked, such as salamis.
Some recipes will also call for Morton Tender Quick, a combination of salt, sugar, sodium nitrate, and sodium nitrite. This isn’t dyed pink, so store it separately from your table salt. *Curing salts are not interchangeable. Always use the type of salt called for in the curing recipe!
Is Curing Salt Dangerous?
In large quantities, curing salt can be very toxic. Don’t breathe it in, and do not rub your eyes. Keep it away from children. However, they are perfectly safe to use in curing recipes as long as you stick to only them.
And what about the risk of cancer from nitrites? Nitrites are commonly found in many foods. You’ll get more nitrites from a serving of spinach than from an entire cured salami.
Botulism is a greater danger than nitrites in cured food. So, follow the curing recipe and use the curing salt it calls for!
Alternatives to Curing Salt?
Ideally, you should use curing salt to preserve meat. It simply does a better job of ensuring that botulism spores cannot survive. It is possible to cure meat with regular salt. However, there can be some issues.
The first issue is that table salt is iodized. The iodine in the salt can impart a weird taste in the food. Table salt also often has anti-clumping agents added to it. This can make dry cures get lumpy or cause sediment to form in brine.
If you are going to cure with regular salt, you should look for non-iodized salt (again, follow the recipe!).
Note that the size of salt grains can vary. This will affect how much salt there is in one measurement unit. For example:
1 cup of table salt: weighs approximately 10 ounces
1 cup of kosher salt: weighs anywhere from 5 to 8 ounces
Thus, 1 cup of table salt differs from 1 cup of kosher salt. To ensure you are using the right amount of salt, you must weigh the salt on a scale instead of relying on measuring cups.
Natural Nitrates for Curing Meat
If you want to use regular salt for curing but still want nitrates for preserving, one solution is to use celery juice. The celery juice contains natural nitrates, which will work similarly to saltpeter in curing. It’s not as effective as curing salt, so do this at your own risk.
When you are just beginning, it’s best to follow recipes for curing instead of making up your own concoctions. So, don’t try to substitute celery juice for saltpeter in curing recipes.
Methods of Curing Food with Salt
There are three main ways that salt can be used for curing meat: Dry curing, injecting, and wet curing. However, wet curing is usually the safest to do at home. This method is best for ham, bacon, and small pieces of meat. To dry cure, put the meat in a container and surround it with salt. The meat should be in a cold environment (like your fridge) while dry curing.
If you can’t control the temperature and humidity, then dry curing is unsafe. Thus, it isn’t recommended that you try dry curing at home unless you are a professional and have access to microscopes/analytical tools that can be used to check the safety of the meat.
Method 2: Injection Curing
Injecting involves using a syringe to inject a salty brine into the meat. Unless you have access to professional tools, it is tough to distribute the brine evenly throughout the meat. Thus, it generally isn’t recommended for DIY curing.
Method 3: Wet Curing (Submersion)
This is the best method if you are trying to cure small amounts of meat at home. It involves soaking the meat in salty brine. Meat already contains a lot of moisture, but the salt in the brine draws it out to create an equilibrium.
With wet curing, controlling the amount of salt you use is straightforward. The brine will get through all the meat without making “pockets,” as can happen with injecting.
Wet curing should be done in a refrigerator. Meat must stay submerged under the water during the entire process. If exposed to the air, bacteria will quickly start to grow. Small cuts of meat can be wet cured in just a few days. Large cuts of meat can take weeks to wet cure. The meat must be cooked before consumption.
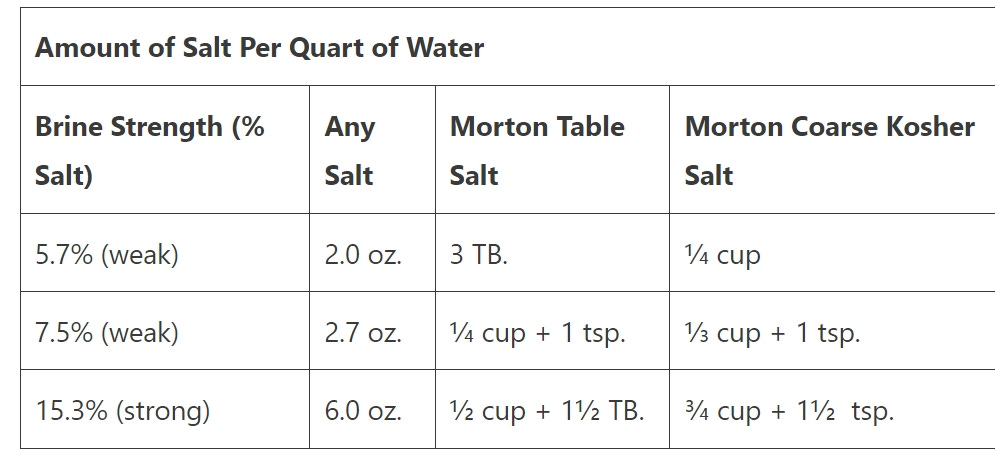
How Much Salt to Use in a Brine?
The USDA recommends using one ounce of curing salt per quart of water. However, you can make a stronger brine if you like salty meat.
How Do You Know When Meat Is Finished Curing?
Curing is part art and part science. There is no exact amount of time for the meat to cure. It depends on your personal tastes, the type of meat, the size/cut of the meat, and the strength of the cure. However, here are some general guidelines to follow so you know how long curing will take.
Dry Curing Time:
You will know that the meat is cured if it reduces in weight by 35-40%. Large cuts of meat could take weeks or even months to finish. The only way to know if the dry cure is done is to weigh the meat. Use this formula:
Beginning meat weight X 0.65 = target weight when curing is finished
Wet Curing/Brining Time:
The brine takes approximately 24 hours to soak into ½ inch of meat. However, the type of meat, texture, and brine strength can all affect how long you need to cure the meat in a brine.
*Avoid stacking meat in brine. If you stack two pieces of ½ inch meat, you now have a 1-inch slab of meat. It will take longer for the brine to get into the meat.
Here are some general guidelines:
Weak Brine: 3-4 days per pound
Stronger Brine: 2 days per pound
If the meat hasn’t been cured long enough, the color will not be uniform throughout. You don’t have to worry about curing meat too long (assuming you’ve kept the temperature at a safe level). If the meat is cured too long and is too salty, you can always soak it in plain water to remove some of the saltiness.
Remember that cured meat should be treated as though it is raw meat. To preserve meat with salt, you need to completely displace all the water in the meat, so curing will take much longer!
Always play it safe and cook or smoke your meat after curing. And finally… When in doubt, throw it out. It’s better to play it safe than sorry!
Ingredients for making Pemmican:
Red meat: Traditionally game meat is used, but now beef is most used. 5 lbs. of meat will make 1lb. of dried meat
Fat (suet): You will need to render the fat into tallow. Instructions below. Use about a 1:6 ratio of fat and dried meat, but you can experiment. The ratio doesn’t have to be exact!
Salt: 1tsp salt per pound of meat. (Curing salt not table salt)
Optional: dried berries, herbs, spices, honey
Instructions:
Cut the fat off the meat: You should only dry the meat, without any fat on it.
Salt the meat: This will help inhibit bacteria growth and make the pemmican taste better. We use Morton Tender Quick, a combination of salt, sugar, sodium nitrate. *Curing salts are not interchangeable. Always use the type of salt called for in the curing process.
Dry the meat: Instructions follow:
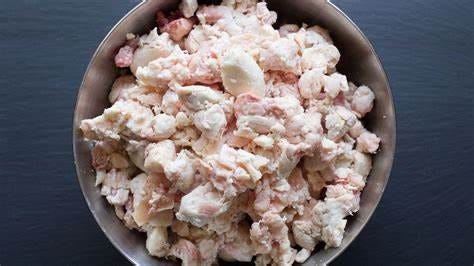
Turn the dry meat into a powder: A meat grinder is best, but you can also use a blender or food processor. It needs to be almost a powder with no big chunks in it.
Turn the dried berries into a powder: Same as with the meat.
Mix the powdered meat and powdered berries together.
Heat the fat so it liquefies.
Pour the fat over the powdered meat/berry mixture. The ratio of fat to dried mixture is about 1:6, but you can experiment.
Let cool and form into balls or bars.
Wrap in wax paper or plastic bags and store.
How to Dry the Meat
The easiest way to do this is to use a food dehydrator. This is our preferred method. You can find one very reasonably priced at Wal-Mart or on Amazon, Academy Sports, or at a Bass Pro Store.
Cut the meat into thin strips and put them on your dehydrator rack. Follow the dehydrator instructions for drying time and temperature and occasionally rotate the racks.
If you don’t have a dehydrator, you can dry meat for the pemmican in your oven.
Turn on the oven to 165°F
Cut the meat into very thin strips and put them on a baking sheet. You can also put the strips directly onto the oven rack, but some drippings might get inside your oven.
The meat will need to dry in the oven for about 15 hours – occasionally open the oven door to release the moisture which builds up.
**The meat is done drying when it is VERY CRISPY. It is very important that the meat is dry or else the pemmican will not last as long.
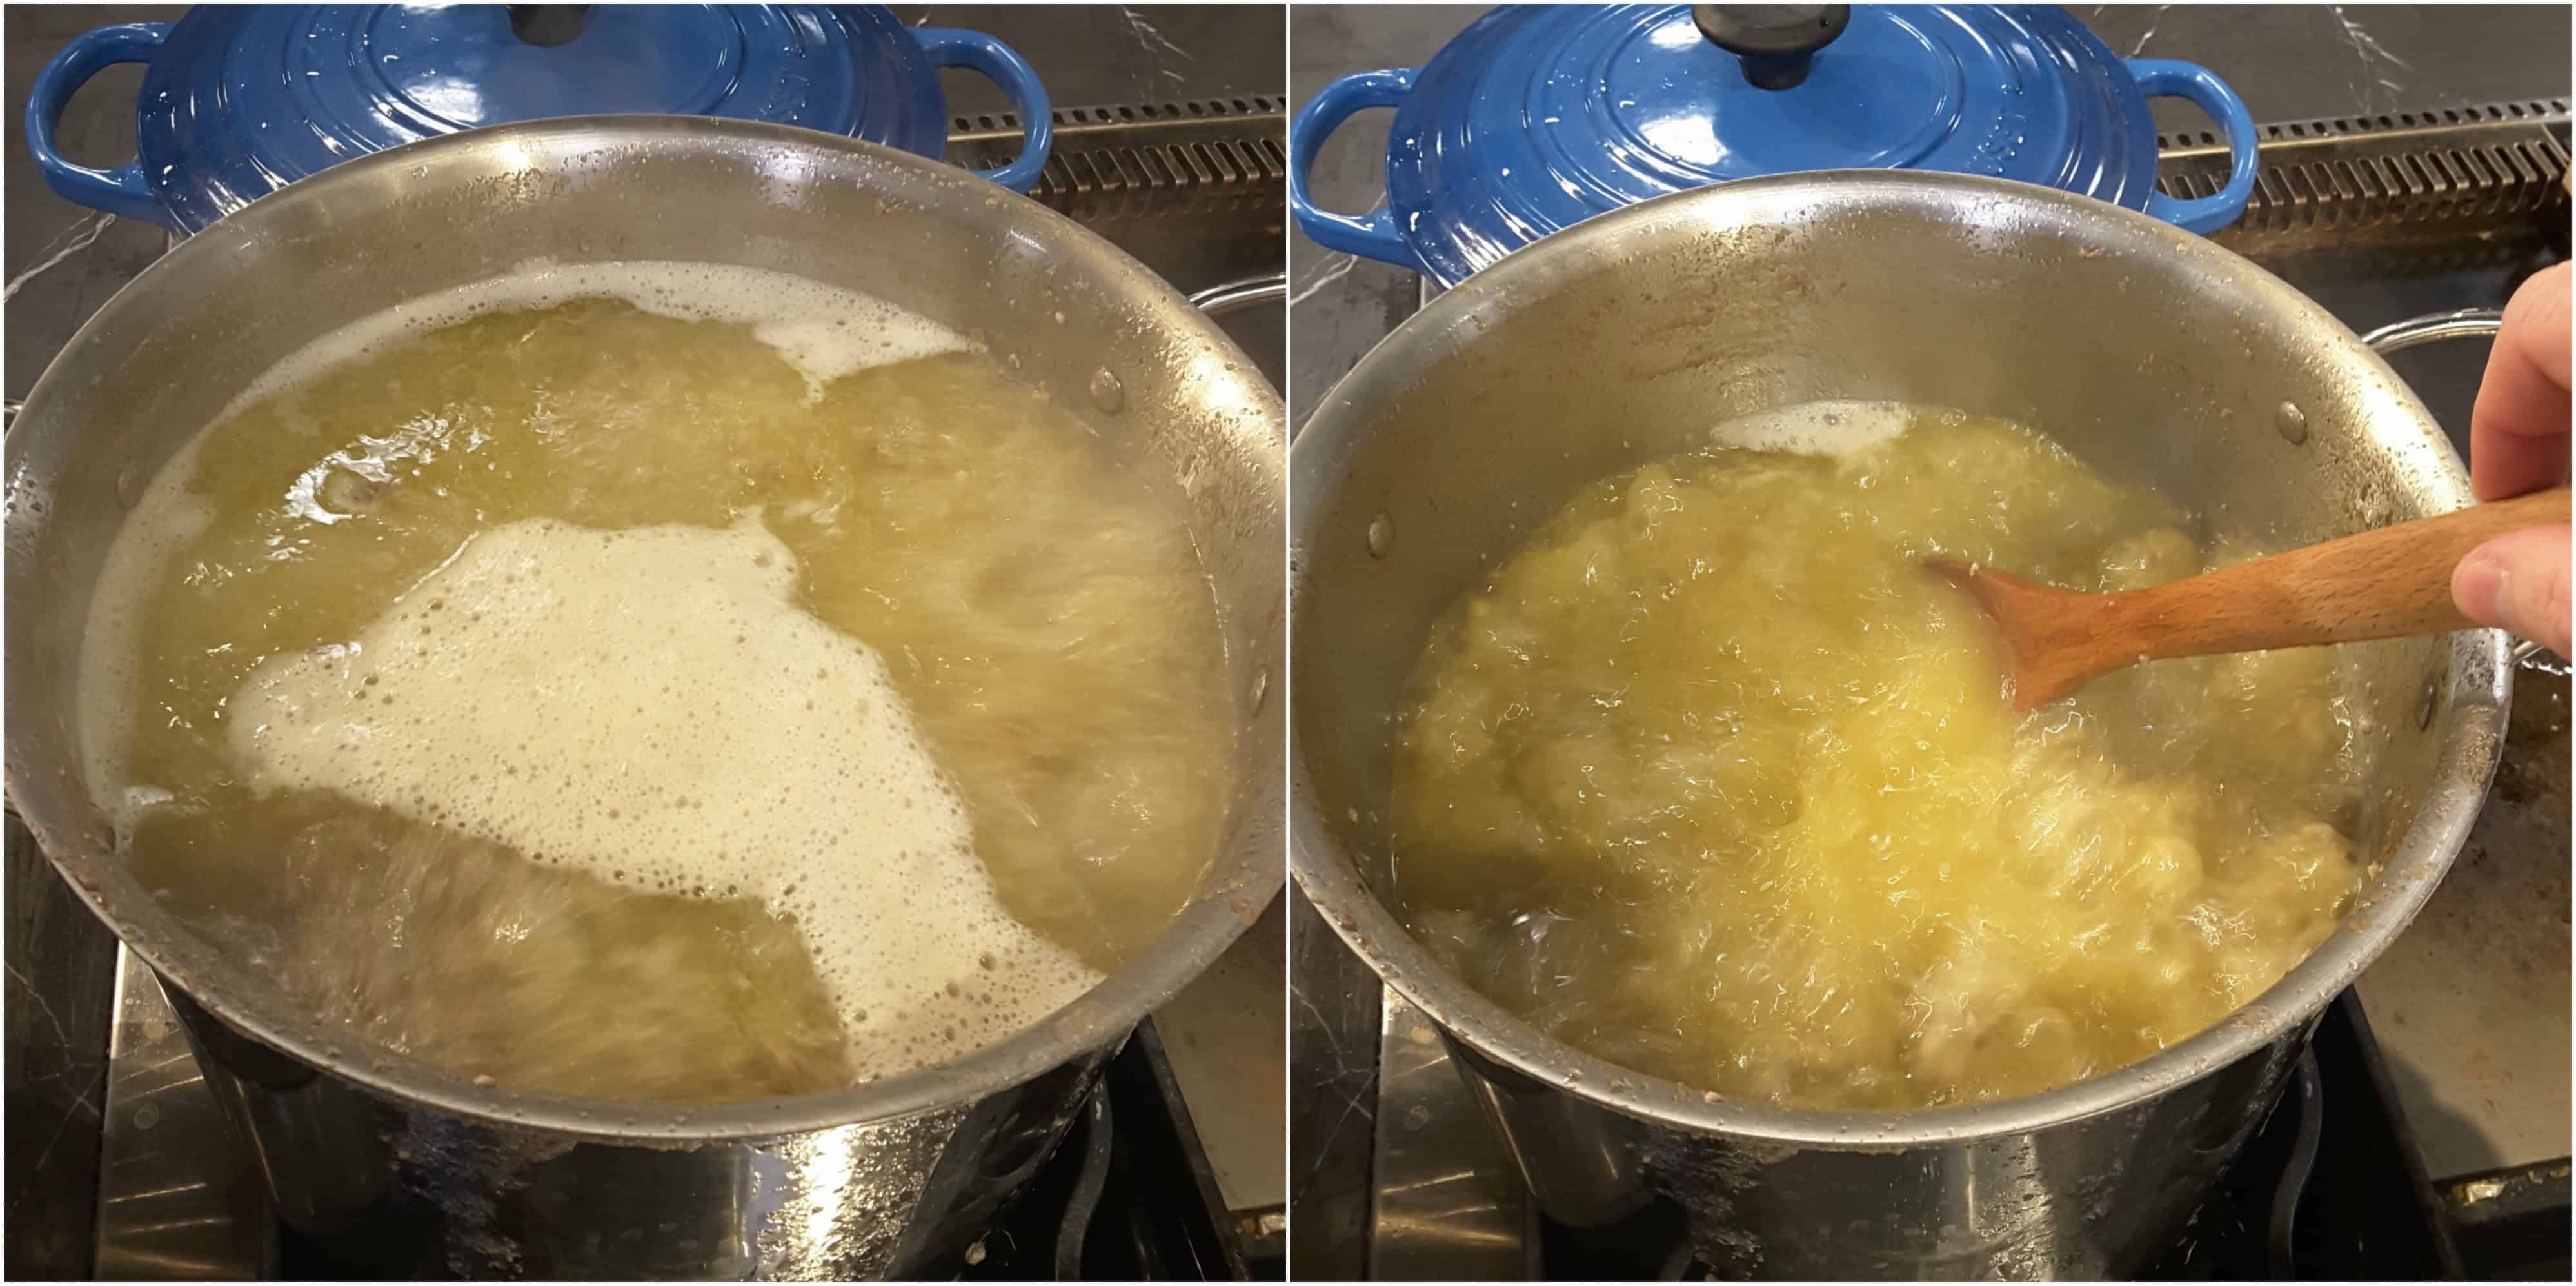
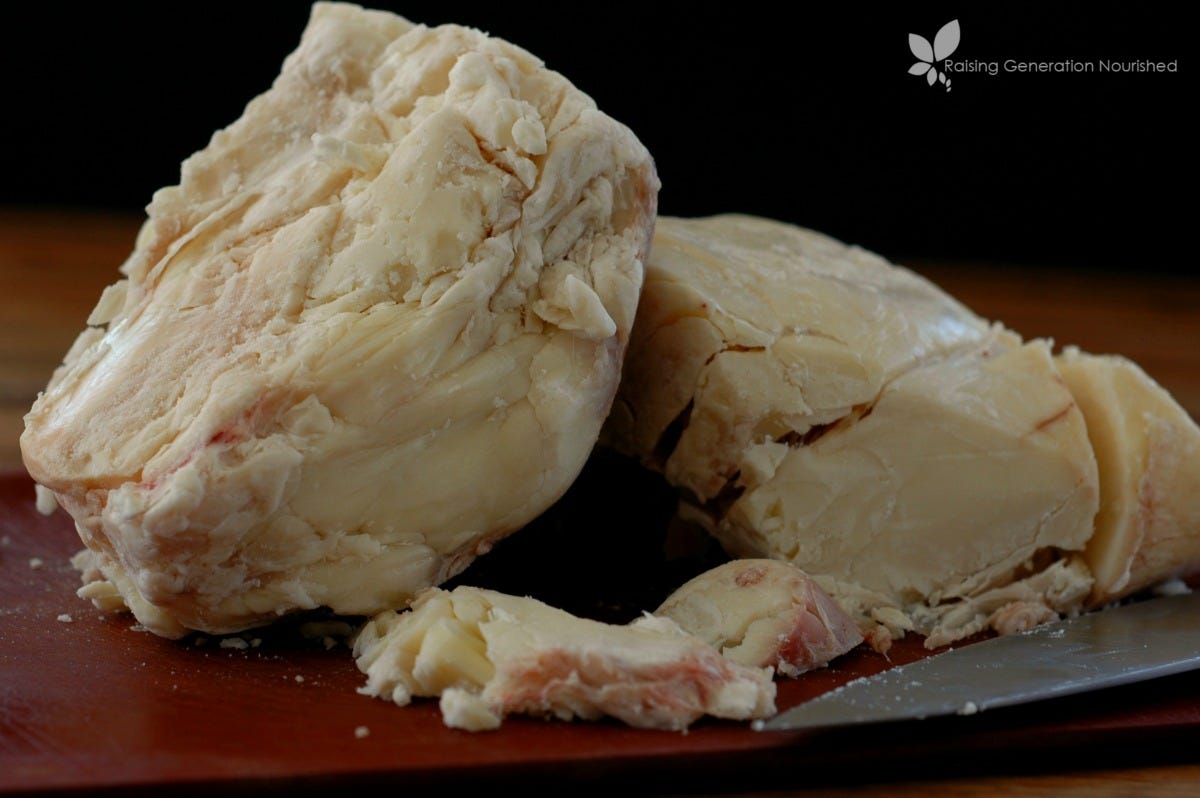
How to Render Fat into Tallow
Fat will eventually go rancid. But, if you render it first, then it can last virtually forever. Rendering fat into tallow sounds complicated, but it is actually very simple and has many health benefits. It’s best to use beef fat for pemmican, but you can also use lamb fat. You can get these from your local butcher, they may even give it to you for free, or at a low cost. This fat is also known as suet.
Remove any remaining meat which may be on the fat.
Cut the fat into chunks. You might also want to put it into your food processor to make smaller chunks.
Put the fat into a big pot.
Cook on the lowest setting. For each pound of fat you render, you will need to cook it for about 1 hour. (Yes, this will take a while) You don’t have to monitor the fat the entire time but do occasionally check in and stir it so it doesn’t burn.
The fat will melt, but you will see bits floating on the top.
Once the bits on top are golden brown and the fat stops bubbling, then the rendering is done.
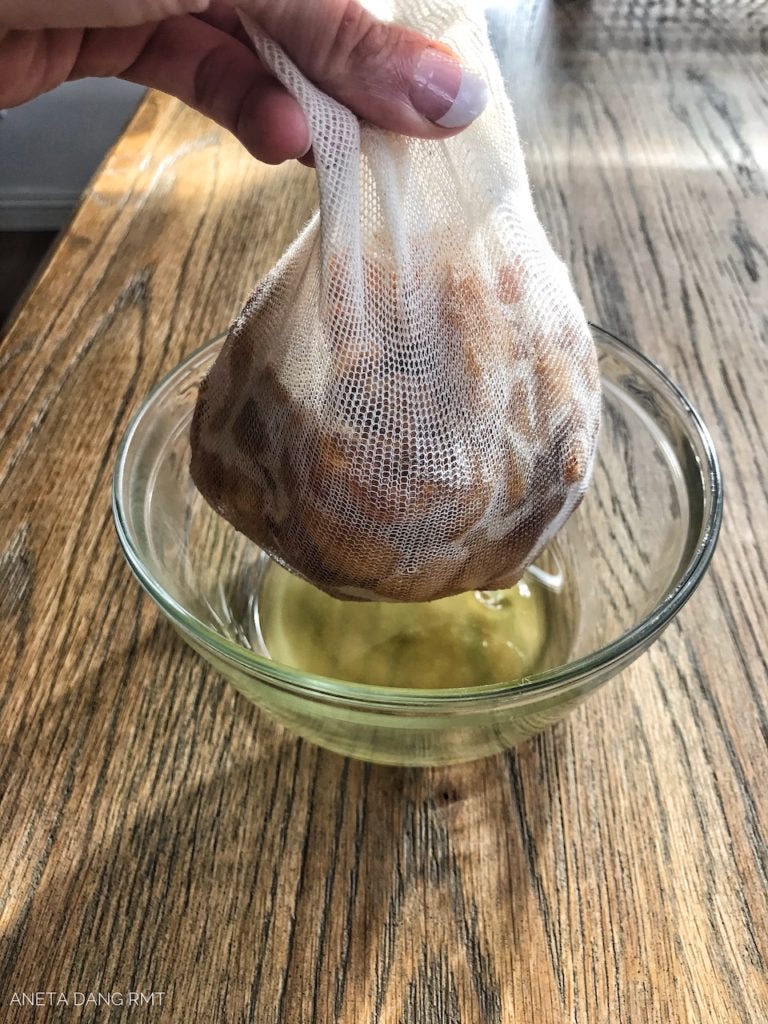
Strain the fat through a sieve or cheesecloth into a jar. You just want the liquid parts and not those crispy bits. When the fat (now tallow) cools, it will be a golden color.

*You can also use a slow cooker to render fat into tallow. Just put the fat into the slow cooker, put it on the Low temperature setting, and let it render for a few hours. You’ll know it is done when the fat is liquid with crispy chunks floating on top.
Pemmican is made from just 2 ingredients: meat and fat, though berries or other ingredients are often added.
The fat provides the energy needed for a strenuous journey. The meat provides the protein and strength for the journey. When berries are added, they provide additional energy (glucose) and antioxidants, vitamins, and fiber.
You can survive for weeks or months on nothing but pemmican and water. Since it is so nutritionally dense (lots of energy without a lot of weight), it is the perfect food to put in your survival backpack or aka your Bug out Bag.
Note that pemmican doesn’t taste very good – and this is another reason it is such a good survival food.
Why would you want to pack something which isn’t tasty? Consider that the Canadian Arctic Rescue team recommends putting a can of dog food in your car as survival food.
The idea is that dog food tastes bad, and you won’t be tempted to eat it so quickly (as you might with yummy granola bars). The dog food idea is interesting, just kidding, but I’d rather pack pemmican for my survival food!
If everything is dry and the meat is prepared properly, this stuff can last for decades when stored correctly.
However, because there is a lot of fat in pemmican, the fat can go rancid from oxidation. There is also a lot of moisture in the air, which can re-enter the pemmican. Once moist, the pemmican can start going bad.
The key to maximizing the shelf life of pemmican is to store the pemmican away from oxygen and moisture by using Mylar bags and oxygen absorbers. To play it safe, date the packaging and make sure to cycle/rotate through your pemmican stockpile every year or so.
How do you store pemmican?
The key to maximizing the shelf life of pemmican is to keep it in a cool, dark, and dry place. When stored in these conditions (such as in an airtight container in your pantry), the pemmican should last at least 6-12 months.
If your region is particularly humid and hot, then you are probably better off storing pemmican in the refrigerator. Better safe than sorry!
If you want to store pemmican for long periods of time (such as for emergency food), then you will need to package it in Mylar bags with oxygen absorbers – but it will need to be incredibly dry before packaging it.
Can you use pork fat in pemmican? No.
We would caution against using any cut of pork or pork fat in pemmican as it can contain harmful bacteria.
Can you use lard to make pemmican? No.
Lard is rendered pig fat; we would advise against using any pork products in pemmican due to the risks of trichinosis.
Can I use ground beef to make pemmican? Yes.
Ground beef should work well but make sure it doesn’t burn in the preparation phase.
Can I use coconut oil instead of tallow in pemmican?
If dried and prepared correctly. Coconut and other oils should work well in place of tallow. However, the shelf life of the pemmican might be shorter than if you don’t use tallow.
Trail food is an essential part of any hunter’s kit. Snacking in the field keeps your energy level up whether you’re burning calories on long hikes or sitting in a blind all day. This is especially true in cold conditions. On most hunts, various bars, jerky, and trail mix make up a huge part of hunters daily caloric intake. The best trail snacks are easy to carry, don’t spoil, and blend energy-rich fats, proteins, and carbohydrates.
It seems pemmican was so important to ancient hunters that it was produced in large-scale operations. Recently, researchers unearthed a pemmican production site used by ancestors of the Blackfoot people in north-central Montana. Excavations revealed fire pits, tools, and bones used for processing pemmican near a Native American bison hunting area known as Kutoyis.
For modern hunters, pemmican is experiencing a bit of a revival-or least the term is. Several protein bar producers are using “pemmican” in their marketing materials, though many of these offerings have little in common with traditional pemmican. The best way to experience the real deal is to make pemmican with your own wild game, which is an easy and fun chore.
Pemmican combines all the best attributes of jerky, trail mix, and energy bars into the ultimate trail food. It’s portable, lasts forever, and packs a nutritional punch. If you’re wondering what to do with some of your older cuts of venison in the bottom of the freezer, now is the time to use some of it to make pemmican for this fall’s hunting seasons.
Ingredients for Venison Jerky
1 lb venison
1 lb rendered bear fat or substitute with wild boar fat, beef suet etc.
½ lb dried cranberries, blueberries etc.
½ lb pine nuts or substitute with cashews or walnuts
*All ingredients are mixed at equal ratios so it’s easy to adjust for quantity.
Preparation
Drying meat is a simple process that can be done in the oven or a dehydrator. But instead of using plain dried meat, you can also use jerky. The salt cure will increase shelf-life and add flavor. You can purchase many spices for jerky, for a variety of different flavored jerky.
Combine all of the ingredients except for the meat in a medium bowl. Whisk to combine well.
Add the strips of game meat to the marinade, being sure to cover it all completely. Marinate in the refrigerator at least 12 hours and up to 48 hours; the longer it’s in the marinade, the better.
Remove the meat from the marinade and drain. Pat it dry. Lay out the meat on dehydrator trays with space between the slices. Set the dehydrator to 145°-155° and dry the jerky for 1-1/2 to 2-1/2 hours or until completely dry. Dehydrators may vary.
You want the meat to still have some flexibility. The pieces shouldn’t crack in two when you bend them; rather, they should break to reveal a network of thin white lines.
A Note on Drying Jerky in Your Oven
I like to use a dehydrator—it’s the most efficient way to control the heat and rate at which the jerky dries out. But if you don’t have one, you can use an oven set at very low heat—say about 165°
Crack the door of the oven and let it go for several hours at least. It usually takes somewhere between 4 and 7 hours.
Watch it carefully throughout the process—you want it to cook evenly and not get overdone.
In Closing
Whether you are using jerky or plain dried meat, you must have a very dry product to make pemmican properly. You want jerky that cracks and crumbles when bent. Grind the dried meat or jerky into a rough powder. You can use a food processor to do this quickly. Do the same with the dried berries and nuts.
Next, you’ll need to mix the dry ingredients with rendered (cooked and liquefied) fat. Once the pemmican is well-mixed, you’ll need to pour it into a mold to set up. Muffin pans or cookie sheets work well for this. After the pemmican has rested, remove each piece from the muffin pan or cut the pemmican into blocks on the cookie sheet and then pack pieces individually with a vacuum sealer to keep them clean while out in the field.

There are many wonderful videos on You Tube for rendering fat into tallow. If you’re interested in this, it opens a world of other options for tallow made products you can make at home, from soap and candle making, natural moistures and some wonderful dessert recipes.
Thank you so much for such in depth info!
This was fascinating. It's something I'd like to try some time.